Pages

Sunday 27 November 2011

For all you MODELS OWN fans


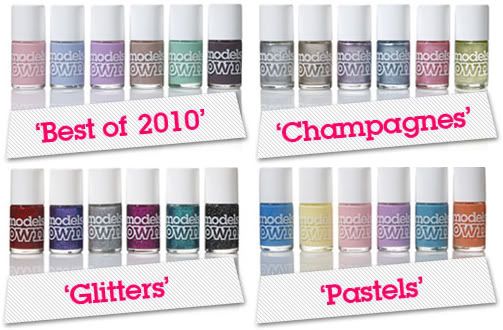
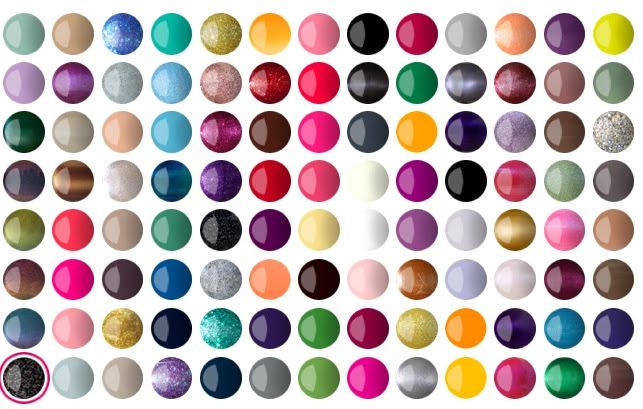
I absolutely love "Models own" nail polishes, and at the moment just in time for christmas they are offering an amazing deal, why not treat yourself to some pressies or treat your friends this Christmas. Models own nail polishes are quite pricey but not too much. Each nail varnish costs around £5.00 which isn't too bad. Also You don't mind paying out a little more if you know the products are good. They last for ages and you only need one coat. Amazing products and fabulous colours so hard to choose a few. They even have a new shattered nail polish range.

****MODELS OWN OFFER****

Buy 3 models own nail polish and receive £3.00 off costing you £12.00 for 3 (£4.00 each)
Buy 5 models own nail polish and receive £7.00 off costing you £18.00 for 5 (£3.60 each)

Also if you are a first time buyer on the models own website You receive a free black khol eyeliner worth £5.00 to do it this add the eyeliner to the basket and in the check out area write "kohlblackfree" in the voucher code box.

Everything is free post and packaging so it really is an amazing deal. No other website are offering this deal and I have searched website for cheap deals and no other sites are offering the nail polishes any cheaper.

To get this amazing deal go to

Here are the many colours you can choose from :)


Thursday 3 November 2011

Autumn winter trend : Feather hair extensions

I love, love this autumn trend. It was also quite popular last summer. The trend seemed to be a lot more popular in the USA. This feather extension trend would have been a great thing for summer festivals. Using autumn colours I think this trend will really be big this winter.

Imagery from google images

I love the way the feathers blend so well with the hair. This is a great hair accessory for this autumn winter. This trend will look fab with those faux fur winter coats.

Imagery from featherslicous

They come in all sorts of different colours to match your hair. You can go for a natural look or if you want to be s little wild why not try the more vibrant colours.

Imagery from photo bucket


imagery from Hilary duff archives
Celebs are catching onto the trend too.

The feathers used for extensions are completely natural and can be washed, blow dried, curled and straightened. So they are completely effortless.
They are very easy to apply with micro beads. The bead and feather is applied to the hair by clamping the bead a feather to your hair. The feather extension will not ruin your hair and can be easily removed if you don't fancy wearing them.

I would love to hear your comments about this trend :)

Thursday 27 October 2011

Check out our lovely jewellery store


Check out our shopping page, and like our page.

Floral Polkadot is a vintage inspired women’s jewellery brand, everything is handmade and inspired by retro products and up to date fashion. These handmade jewellery items are a little treat for someone so sweet.

Here are some of our designs :)


We have more stuff on sale at our Facebook page, all payments are paypal so it's all safe :) we ship all over the world.
I would love to hear your comments :)

Sunday 23 October 2011

Painting with light

I love always loved how camera catch the speed of light, and now I have a professional camera that can capture this. I though I would test it out. Enjoy :)

Imagery by Floralpolkadot

Imagery by Floralpolkadot

Imagery by Floralpolkadot

Saturday 22 October 2011

Lady gaga glams up like Audrey Hepburn

As much as I love Lady Gaga's outrageous fashion, she look absolutely amazing in the modern day Audrey Hepburn look. Very elegant. Breakfast at tiffanys is one of my favourite films. And I love how lady gaga can pull off any style. And perhaps she will start a new Audrey Hepburn trend.
Imagery courtesy of startrak photos


Imagery courtesy of startrak photos

Imagery courtesy of Audrey Hepburn images

Imagery courtesy of Audrey Hepburn images

If you love this look, check out the dresses in topshop :) they have some great looks to achieve this Audrey esq look.
Crowl neck hourglass dress
Price:£50.00


I have this dress in Coral and I absolutely love it :)
tuck shift dress
Price:£46.00


Hollywood black lattice dress
Price:£40.00

My parents went to Prague and all I got was this amazing hat :D

This is possibly the best hat I have ever been bought, my rents know me too well. It's from a brand called new Yorker I have never heard of it myself but if they produce stuff like this then it must be amazing :D


Imagery by Floralpolkadot

Sunday 16 October 2011

DIY skeleton t-shirt and jumper

Whilst looking at the wild fox website I saw the skeleton jumper, and loved it also with it being close to Halloween I thought I would make the t-shirt and jumper myself. As the wild fox jumper is £140 I couldn't afford to buy it. You can still wear the t-shirt and jumper after Halloween. The t-shirt looks great with a leather jacket and leggings or jeggings. This DIY is so easy to do and doesn't take long at all :)
inspiration images
Imagery by wild fox
imagery of Ellie Goulding at V Festival from google images
imagery of Jamie Whinestone from google images
imagery of Ashley tisdale from google images

All you need
-plain black t-shirt
-plain black jumper
-PVC fabric
-scissors
-pencil
-card
-fabric glue

*sorry for the rubbish photo quality I used my blackberry to take pictures*


Start off with your plain black t-shirt or black jumper or both.
imagery by Floralpolkadot

Use the Skeleton stencil to copy.I placed my card under the printed stencil and pressed hard whilst tracing the image so it indented through so you have an outline on the cardboard.

Once you have drawn the skeleton onto the cardboard cut the image out and place onto your whie PVC fabric.
imagery by Floralpolkadot

imagery by Floralpolkadot

Once the stencil is placed on the PVC fabric ( n the non PVC side) Draw around the stencil to have the image transferred onto the fabric.
Imagery by Floralpolkadot

Once you have transferred the image to the fabric, cut the pattern out non the fabric.
imagery by Floralpolkadot

imagery by Floralpolkadot

Once you have cut the whole pattern it should look like this.
Imagery by Floralpolkadot

Try the jumper or t-shirt on and place the skeleton on your top to see where to place the fabric. With a pin place the pin where you would like to place the fabric.
Imagery by Floralpolkadot


Use fabric glue to attach the fabric to your jumper or t-shirt.
Imagery by Floralpolkadot
imagery by Floralpolkadot


Place the fabric onto top where you have place the pin. Nice you have stuck the fabric to the jumper or t-shirt, remove the pin and let the glue try. Make sure you have a piece if cardboard or wood in-between then t-shirt or jumper. So the glue doesn't go through to the otherside of the t- shirt or jumper.
imagery by Floralpolkadot

And voila the products are made.
imagery by Floralpolkadot

imagery by Floralpolkadot

If you want to add the bones on the sleeves just cut out 4 small bones and do the same.

I would love to hear your comment :)

Floralpolkadot xxx

Sunday 2 October 2011

DIY : Aztec t-shirt part two

I absolutely love Aztec prints at the moment :) I have already made one Aztec t-shirt so I thought I'd attempt another Aztec t-shirt :)

Imagery by Floralpolkadot

All you need
-one plain t-shirt
-White fabric paint
-Scissors
-Masking Tape
-Sponge

Place the t-shirt over a piece of wood or cardboard. This is so you have a flat surface to work on. Also this will stop the paint from imprinting on the other side if the t-shirt. Now add your masking tape to the t-shirt. To make these shapes.
imagery by Floralpolkadot

Make sure the masking tape is securly on the t-shirt so you get a perfect shape.
Use a sponge to add the paint to the t-shirt.
imagery by Floralpolkadot

When it is all covered. Dry for about 10 minutes and reapply the paint to get a thicker colour. Once you have done that let it dry for about 20-30 minutes so it's completely dry.
imagery by Floralpolkadot

This will be your finished result :) next step the fringing :)
imagery by Floralpolkadot

Add masking tape to the bottom of the t-shirt you can choose how high or low you want the fringing.
imagery by Floralpolkadot
Imagery by Floralpolkadot

Cut small pieces to get a fringed effect. Cut up towards the masking tape.
imagery by Floralpolkadot

Once you have cut the fringing into the t-shirt. Tie a knot in each one. This is so the fringing doesn't rip any more.
imagery by Floralpolkadot

Voila and the t-shirt is done :)
imagery by Floralpolkadot

I would love to hear your comments :)